 Explanation in OTHER mode

Assignable mix out field (MPC1000)
If you turn this setting to OFF, the signals of
pads and tracks whose program OUT column is set to Assignable mix
out will be output to STEREO OUT, and will not be output to
Assignable mix out.
When a setup of OUT is 1 or 3, it is outputted only to the L side
of STEREO OUT.
When a setup of OUT is 2 or 4, it is outputted only to the R side
of STEREO OUT.
A setup of the Assignable
mix out field will return to default ON, if the power is turned
off.
Assignable mix out field (MPC2500)
If you turn this setting to OFF, the signals of
pads and tracks whose program OUT column is set to Assignable mix
out will be output to STEREO OUT, and will not be output to
Assignable mix out.
When a setup of OUT is 1, 3 , 5, 7 it is outputted only to the L
side of STEREO OUT.
When a setup of OUT is 2, 4 , 6, 8 it is outputted only to the L
side of STEREO OUT.
A setup of the Assignable
mix out field will return to default ON, if the power is turned
off.
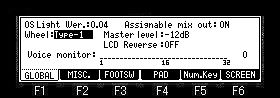
Wheel field (MPC1000)
When the reaction of a DATA wheel is slow or cannot
change the value of one step, please change the set.
Usually, MPC in which Ver2.12 or less AKAI OS was installed
selects "Old type".
MPC in which Ver2.13 was installed selects "New type".
If OS is changed, this set
will return to default setting "New type".
Master level field
You set a master level.
The MAIN VOLUME changes the analog signal level.
This will also adjust the entire level of the MPC digitally.
LCD Reverse field
The color of a screen will be reversed if it turns ON.
Wheel field (MPC2500)
Please select "Type-2", when an encoder(DATA
wheel) is exchanged for the same type as MPC1000.
Or when you can change at a time neither the case where the
reaction of a DATA whell is slow, nor one step of values, please
change a selection.
If OS is changed, this set will
return to default setting "Type-1".

Sustain pedal to duration field
You select how to record sustain pedal information.
YES: The MPC converts the sustain pedal information into duration.
NO: The MPC records the sustain pedal information as it is.
Truncate duration field
When you are recording a sequence in the loop mode, you
can specify how the MPC should operate when it reaches
the boundary of the loop while you are holding a pad.
(it reaches the end of the sequence and jumps back to the
beginning)
TO SEQUENCE LENGTH: The MPC records as played up to sequence
length.
TO SEQUENCE END: The MPC cuts the note at the end of the sequence
even if you hit the pad.
AS PLAYED: The MPC records your performance as it is played.
Tap tempo field
The button or pad which performs tap tempo is selects.
TAP TEMPO: It carries out using the TAP TEMPO button.
PAD1-PAD16: It carries out using the selected pad.
Average field
Please select the number of the taps used in order that
you may calculate tempo by a tap tempo function.
MIDI Note field
Please set a note number, when you perform a tap tempo function
by MIDI in note.
(The keyboard of a MIDI controller etc. can use a tap tempo
function by setting)
Mute/stop of one-shot sample field
During play of one-shot samples, it is the field which selects
behavior when muted or [STOP] button is pressed.
THROUGH: One shot samples are always played until sample end.
IMMEDIATE: One shot samples are stopped immediately when pressing
stop or muting the pad.

Footswitch1, 2 field
It is the mode which assigns a function to a foot
switch.
| PLAY START: |
It works the same as the PLAY START
button. |
| PLAY: |
It works the same as the PLAY button. |
| STOP: |
It works the same as the STOP button. |
| OVER DUB: |
It works the same as the OVER DUB
button. |
| REC: |
It works the same as the REC button. |
| PLAY/STOP: |
When you step on the switch in stop
mode, the MPC will start the playback.
When you step on the switch in play mode, the MPC will
stop the playback. |
| REC+PLAY: |
It works as the same when you press
the REC button and the PLAY button simultaneously |
| OVERDUB+PLAY: |
It works as the same when you press
the OVER DUB button and PLAY button simultaneously |
| REC/PUNCH: |
When you step on the switch in stop
mode, the MPC will start the playback,
when you step on the switch in play mode, it starts
recording, in recording mode, it starts playback. |
| OVERDUB/PUNCH: |
When you step on the switch in stop
mode, the MPC will start the playback,
when you step on the switch in play mode, it starts
overdubbing, in overdub mode, it starts playback. |
| TAP TEMPO: |
It works the same as the TAP TEMPO
button. |
| PAD1~PAD16: |
The MPC will play the selected pad at
the fixed velocity of 127 |
| F1~F6: |
They work the same as the function
keys 1 through 6. |
| PAD BANK A~D: |
They work the same as the PAD BANK
buttons. |
| REPEAT: |
It works the same as the NOTE REPEAT
button. |
| ERASE: |
It works the same as the ERASE button. |
| REC+START: |
It works as the same when you press
the REC button and the PLAY START button simultaneously |
| OVERDUB+START: |
It works as the same when you press
the OVER DUB button and the PLAY START button
simultaneously |
START/STOP
(PLAY START/STOP): |
MPC will begin playback from the start,
when you step the switch in stop mode.
When you step on the switch in play mode, the MPC will
stop the playback. |
| TRACK +: |
When you step a switch, it changes to
the next track. |
| TRACK -: |
When you step a switch, it changes to
the back track. |
| SEQUENCE +: |
If you step a switch, it will change
to the next sequence.
When you step on the switch in play mode, behavior of the
next sequence will also be referred to. |
| SEQUENCE -: |
If you step a switch, it will change
to the back sequence.
When you step on the switch in play mode, behavior of the
next sequence will also be referred to. |
| REC+STOP: |
It works as the same when you press
the REC button and the STOP button simultaneously |
| DUB+STOP: |
It works as the same when you press
the OVER DUB button and the STOP button simultaneously |
| NEXT BANK: |
Reference video |
| BACK BANK: |
Reference video |
Voice monitor field
The number of voices used currently is displayed with
the bar meter.

 F4(PAD)
It is the mode which adjusts the sensitivity of
pads.
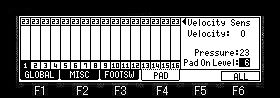
Please refer to "Adjustment of Pads Sensitivity".
F5(Num.Key) (This button is not in MPC1000.)
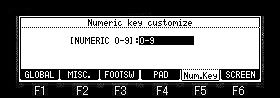
You can assign modes to the 0 to 9 on the numeric button.
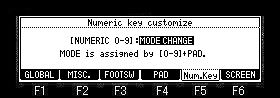
When a DATA whell is turned and "MODE CHANGE" is select,
the mode can be assigned to a numeric button.

By default, the following modes are assigned to each numeric
button.
| 0 |
PROGRAM |
| 1 |
SLIDER |
| 2 |
LOAD |
| 3 |
SAVE |
| 4 |
RECORD |
| 5 |
TRIM |
| 6 |
PROGRAM |
| 7 |
STEPEDIT |
| 8 |
GRID |
| 9 |
SONG |
How to assign modes
While holding down the numeric button to which you want to assign
a mode, press the pad for the mode you want to assign.
For example, if you want to assign RECORD to the "5"
button on the numeric button, press PAD5 while pressing the
"5" button.
The screen will change to the RECORD screen and RECORD mode will
be assigned to the "5" button.
From the next time you press button "5" it will switch
to RECORD mode.
F6(SCREEN)

This is a function for creating manuals and is not
relevant to users.
If the "Screen shots" field is turned ON, "UNDO"
will not work, so users should not turn it ON.