 It is the mode which can perform
edit of an event, carrying out loop playing of the 2 bars. (MODE+PAD15)
It is the mode which can perform
edit of an event, carrying out loop playing of the 2 bars. (MODE+PAD15)
Notes
It works only by the case where the type of a track is DRUM.
When the track type is anything other than DRUM, editing
while looping is not possible.
Moreover, since an audio track cannot be edited, a
waveform is not displayed.
While during loop edit, please do not go to main from
the Loop Edit Mode. (It may not work normally.)
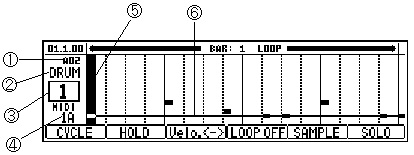
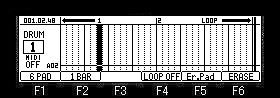
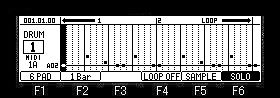
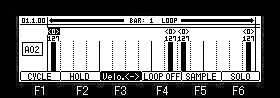
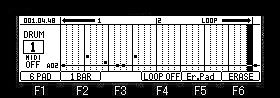
| 1 |
The number of the pad chosen |
| 2 |
Track type field |
| 3 |
Number of the active track |
| 4 |
The port and channel number of a MIDI
output |
| 5 |
Vertical Marker |
| 6 |
Horizontal Marker |
Movement of a bar can be
performed by the <BAR> button.
Regardless of the value of timing
correct, a vertical marker 1 tick moves by [SHIFT] + DATA
wheel.
Change of a track can be performed in a [MODE] + DATA
wheel.
The move interval of the vertical marker
Usually, if a DATA wheel is turned, regardless of the
value of timing correct, it will move at intervals of 12
ticks.
If a DATA wheel is turned pressing the [NOTE REPEAT]
button, it will move at the following intervals with the
value of timing correct. |
| 1/8 = 48
ticks |
| 1/8-3 = 32 ticks |
| 1/16 = 24 ticks |
| 1/16-3 = 16 ticks |
| 1/32 = 12 ticks |
| 1/32-3 = 8 ticks |
| OFF = 1 tick |
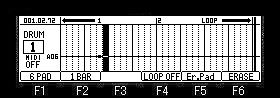
Press the [PLAY] or [PLAY START] button to start loop playback.
The vertical marker is in a hold state so you can move it
manually.
A loop setting of a sequence is ignored. in Loop Edit Mode.
When F4 (LOOP OFF) button is pressed, a loop will be come by off
and will become the usual play mode.
A vertical marker is not held when a loop is OFF.
When Loop is OFF in Loop Edit Mode, the sequence loop is not
ignored.
You can enter events while looping playback by pressing the [REC]+[PLAY]
or [PLAY START] buttons.
Use the DATA wheel to move the vertical marker to the location
where you want to enter an event.

Hit the pad you want to enter an event on.
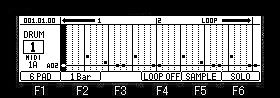
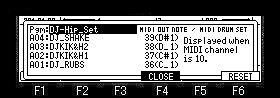
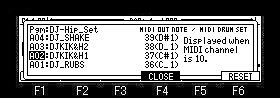
Pressing the F5 (SAMPLE) button opens a window that displays the
samples assigned to each pad.
You can change the sample by moving the cursor to the sample
field.
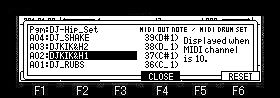
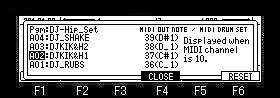
You can change the MIDI NOTE to be output by moving the cursor to
the MIDI OUT field.

Pressing the F6 (RESET) button will reset the
output MIDI NOTE to the default setting.
To move the cursor to the program field, press [SHIFT] +  cursor button.
Press the F6 (SOLO) button to solo the active track.
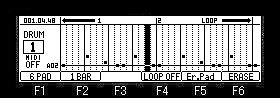
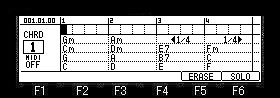
Erase of events
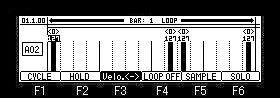
To erase only specific pad events
Set [OVER DUB] to ON, move the horizontal marker to the pad you
want to erase using the up and down cursor buttons, and select
the event with the vertical marker.
In the case of the above figure, the pad A02 of the vertical
marker location is chosen.
F5 (Er.Pad) button is pressed in this state.
An event will be erased if F5 (Er.Pad) button is released.
Please choose the event which wants to turn and erase a DATA
whell to erase two or more pad events, pressing F6 (ERASE) button.

Events will be erased if F6 (ERASE) button is released.
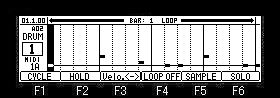
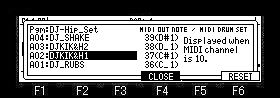
Track type MIDI screen
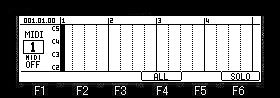
A right screen is a screen when turning ON the
screen and [OVER DUB] which pressed F4 (ALL) button.
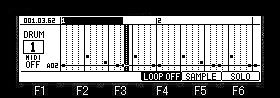
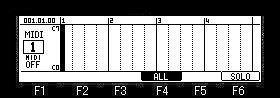
Track type CHORD screen
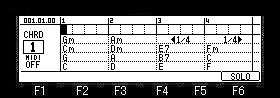
A right screen is a screen when turning ON [OVER
DUB].
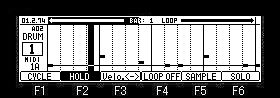
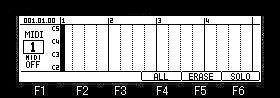
Track type Arpeggiator screen


A right screen is a screen when turning ON the
screen and [OVER DUB] which pressed F4 (ALL) button.
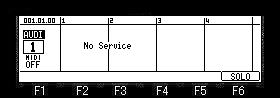
Since an audio track cannot be
edited, a waveform is not displayed.
Next
page